
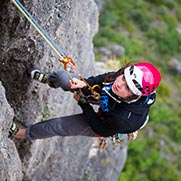


Building a belay anchor and belaying on a bolted multi-pitch route
Anchor building is a key step in multi-pitch climbing. A strong, reliable, and efficiently built anchor is critical to the safety of the climbers. An anchor can be built in different ways depending on the situation and the terrain.
Warnings
- Carefully read the Instructions for Use used in this technical advice before consulting the advice itself. You must have already read and understood the information in the Instructions for Use to be able to understand this supplementary information.
- Mastering these techniques requires specific training. Work with a professional to confirm your ability to perform these techniques safely and independently before attempting them unsupervised.
- We provide examples of techniques related to your activity. There may be others that we do not describe here.
This tech tip only covers belay anchors on bolted multi-pitch routes (e.g. expansion bolts, glue-in bolts or pitons). On traditional routes, some of the concepts covered here may not apply, particularly when using removable protection (e.g. nuts or cams) or natural anchor points (e.g. trees or rocks).
Review: basic principles of a belay anchor
- A belay anchor must consist of at least two anchor points linked together, to address the possible failure of one anchor point (redundancy principle).
- The concepts of fall factor and impact force are crucial factors for the risk assessment involved in building a belay anchor. The tech tips: "Forces at work in a real fall" and "Fall factor and impact force - Theory", address key elements included in this tech tip.
Contents
1. Forces involved at the belay anchor 1a. Forces involved: climbers tethered to the belay anchor
1b. Forces involved: belaying the second
1c. Maximum forces involved: belaying the leader
1d. Conclusion of the tests: two main risks in a lead fall
2. Decision tree and belay anchor types 2a. Mono-directional equalized belay anchor
2b. Quad
2c. Semi-directional equalized belay anchor
2d. Fixed-point belay anchor
3. Techniques for belaying the leader 3a. Belay system attached to the harness
3b. Belaying from a fixed-point belay anchor
3c. Decision tree
1. Forces involved at the belay anchor
Various field and laboratory tests are used to determine the magnitude of the forces involved in a fall. See below for the key values and for more details see the tech tip "Forces at work in a real fall".
1a. Forces involved: climbers tethered to the belay anchor
When the climbers are tethered, only their body weight is applied to the belay anchor (static force). This force cannot cause reliable anchor points to fail.
Note that these forces can be exceeded in the event of a fall on the lanyard (dynamic load).
Keeping the lanyard under tension and staying below the anchor reduces this risk.
1b. Forces involved: belaying the second
When belaying the second, there are two possible scenarios.
In the case of a belay with no loop of slack, a fall by the second produces a very low impact force, and the load on the belay anchor will be about the same as if the climber were tethered to the anchor.
In the case of a less-precise belay, a loop of slack can form in front of the climber. The fall factor and impact force produced remain limited.
1c. Maximum forces involved: belaying the leader
A lead fall is the situation which can generate the highest loads on the belay anchor.
The loads involved are even higher at the start of the pitch:
- less rope length
- high fall factor
- less friction in the quickdraws for helping dissipate the fall energy
Here are some examples of forces obtained in various situations.
More details on these values can be found in the tech tip, "Forces at work in a real fall".
Example of a factor 0.3 fall
(2 m fall on 7 m of rope, belaying off the harness)
Example of a factor 0.7 fall
(2 m fall on 3 m of rope, belaying off the harness)
Example of a factor 0.8 fall when leaving the belay
(4 m fall on 5 m of rope, belaying off the harness Test conducted with 80 kg dummies)
Example of a factor 1.74 fall when leaving the belay
(4 m fall on 2.3 m of rope, belaying off the anchor with a GRIGRI. Test conducted with an 80 kg dummy)
Belay situation not recommended for field use
1d. Conclusion of the tests: two main risks in a lead fall
Risk n° 1: overloading the redirect point
The forces generated by a lead fall with a significant fall factor can exceed the strength of less-reliable anchors, especially at the redirect point (pulley effect).
Although it is made up of several anchor points (redundancy), a belay with one anchor point pulled out could quickly endanger the climbers.
Risk n° 2: belayer pulled
In the event of a lead fall, the belayer can be pulled into the rock and/or risks letting go of the rope.
This risk increases with a significant fall factor or a major weight difference between climber and belayer.
Belayer pulled into the rock when belaying under an overhang
Belayer pulled into the belay anchor in a traversing start
The structure of the belay anchor, as well as the lead-belay method, can be adapted to mitigate the risk in these situations.
2. Types of belay anchors
The list of belay anchors below is non-exhaustive. Variants of these belay anchors, as well as other types of belay anchors also exist, each with their own advantages and disadvantages.
2a. Mono-directional equalized belay anchor
- No shock load in the event of anchor-point failure.
- Versatile, suitable for use on a variety of anchors.
- Poor load distribution in the event of a lateral pull.
- This type of belay anchor eliminates shock loads in the event of anchor-point failure, making it an option for use with less-reliable anchor points.
- This type of belay anchor can also be built using the climbing rope(s), with no need for additional equipment. However, the climber will be tied to the belay anchor and will not be able to free themselves in order to perform a rescue operation, for example. Belay transitions will also be more complicated if not swapping leads.
- If the anchor points allow it, a quickdraw clipped to the top point provides a pre-clipping point for the leader when starting the next pitch.
2b. Quad
- The load is always well distributed between the two anchor points, even if the direction of pull changes.
- The master loop can be separated into two independent loops, offering more space and convenience for clipping multiple carabiners (e.g. multiple parties at the belay, equipment organization).
- The belay anchor can be pulled in two different directions simultaneously.
- If an anchor point fails, the equalization point falls to the end of the loop causing a shock-load on the second anchor point.
- A long length of cord or webbing is required for widely-spaced anchor points.
- Greater spacing between the knots allows more lateral movement, but increases the impact force in the event of an anchor-point failure.
- Depending on the position of the belay anchor points, the position of the knots in the sling can be readjusted.
- The carabiner must be clipped into two of the four strands between the two knots.
- The quad can be made with a 180 cm sling, like the PUR’ANNEAU (light and compact) or 7 mm cord (bulkier but more versatile).
- Be sure to position the webbing stitching or cord knot outside the master point (between the knot and the anchor).
2c. Semi-directional equalized belay anchor
- The load is always well distributed between the two anchor points, even with a lateral pull.
- If an anchor point fails, the equalization point falls to the end of the loop causing a shock-load on the second anchor point.
- Unlike the quad, a twist is required in one of the two webbing strands to ensure the sling captures the carabiner in the event that one of the anchor points fails.
- Requires the use of a master point carabiner for all connections to the belay anchor. Make sure this carabiner is correctly positioned and locked the entire time the belay anchor is in use, and limit the number of connections to this carabiner.
- Greater spacing between the knots allows more lateral movement, but increases the impact force in the event of an anchor-point failure.
2d. Fixed-point belay anchor
- Suitable for lead belaying with the belay system on the anchor.
- This type of belay anchor allows the master point to be positioned closer to the anchor points, compared to other types of belay anchors. This can help improve the ergonomics of belaying the second, in the event the anchors are positioned close to a ledge, for example.
- No load sharing between the two anchor points.
- Considering the loads the belay anchor may sustain, this non-equalized construction is best used on solid, reliable fixed anchors.
- The master point is built on the lower of the two anchor points, in a sling-loop or directly on the carabiner. Using a bowline on a bight to form the master loop in the sling allows it be easily untied.
- The tensioned sling between the two anchor points reduces the risk of a shock-load at the end of the sling, in the event of failure of the primary bolt. The clove hitch allows adjustment of the sling length between the two anchor points, but other knots may also be used (e.g. overhand knot).
- The webbing master loop allows good freedom of movement between carabiners, especially when the leader is belayed directly from the belay anchor.
Consequences of equalization angles
The angle of the equalization affects the load distribution on the anchor points: the smaller the angle, the lower the load is on the anchors.
The 90° angle, easy to remember and identify, is a good upper limit for the equalization angle.
3. Techniques for belaying the leader
Depending on the situation, different belaying methods can be used.
3a. Belay system attached to the harness
- Smooth, precise belaying.
- Versatile method: works on all belay anchor types
- Belayer displacement cushions the fall.
- Risk of the belayer being pulled if there is a large weight difference and/or a high-energy fall.
If the terrain allows it, tethering farther from the belay anchor (e.g. using a clove hitch in the rope) gives the belayer more room to move for dynamic belaying, thus reducing the risk of hitting the belay anchor or the wall.
If anchor quality is dubious, put the redirect point on the equalization point of the belay anchor.
3b. Belaying from a fixed-point belay anchor
Putting the belay system on the belay anchor avoids the risk of pulling the belayer in a lead fall. This technique is for use when the anchors are unquestionably solid. The fixed-point belay anchor is suitable for this technique, as it reduces the length of sling that will flip over when the fall is stopped.
- No risk of the belayer being pulled when the leader falls: no risk of hitting the rock or belay station and less risk of letting go of the rope.
- Suitable when there is a significant weight difference between climber and belayer.
- Suitable for traversing starts (lateral loading) or for belaying under an overhang.
- Lead belaying is ergonomic if the belay anchors are positioned low (approximately at the belayer’s chest height).
- Belaying is less smooth and precise: not suitable for working a route.
- Unsuitable for belays with less-reliable anchors, especially because of the change in pull direction during a fall and the lack of equalization.
- Complicated dynamic belaying (possible only by letting the rope slip in the belay system, belay gloves recommended).
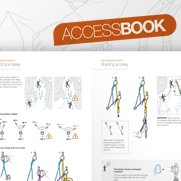
3c. Decision tree
The choice of belay anchor type and belay method depends on your assessment of the situation, taking into account such factors as the anchor quality or the risk of a lead fall.
The decision tree below provides a guide for reflecting on the various points explored in this tech tip.
It is your responsibility to carry out your own risk assessment. This tech tip is no substitute for training and experience acquired in the field.